Wednesday, November 2, 2011

Andrew loves Elizabeth 29.10.2011


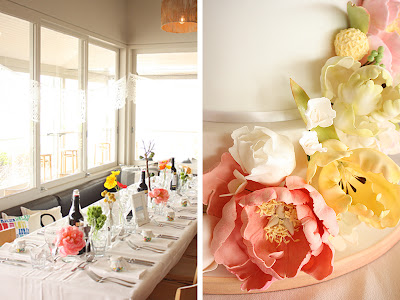
We had the absolute pleasure of contributing to the wedding of some dear friends this past weekend; the lovely Andrew and Elizabeth. Liz's vision for her special day was in keeping with her South American background - a feast of colour, energy and fun! We created a custom wedding stationery suite incorporating these elements using typography (in Spanish) and some gorgeous traditional papel picado illustrations.

The stunning venue, The Baths in Sorrento, provided the perfect backdrop for the four tier floral cascade cake that we created using the bridal bouquet as inspiration. The cake featured three delicious flavours as chosen by the bride and groom: coconut, orange and almond and white chocolate mud...perfect for the summery feel of the day! The bride looked amazing, complete with awesome bright turquoise shoes!

The weather held up brilliantly for the afternoon ceremony on the sand before the guests kicked up their heels for a night of dancing and fabulous food.

Thank you Liz and Andy for letting us be a part of your special day. We had a blast!

View photography from the day over at Stewart Leishman's website.

*Andrew and Elilzabeth's wedding was also featured on the oh-so-fabulous Style Me Pretty blog! Check it out here!

Flowers: Hello Blossoms
Venue: The Baths, Sorrento VIC
Cake, stationery and styling: Cake Ink.
Photography: Cake Ink.
 

Wednesday, October 26, 2011

Ida and Dan's wedding at The Hotel Windsor


We were lucky enough to make a gorgeous wedding cake and custom favours for the lovely Dan and Ida at the weekend. They hosted an intimate reception at the beautiful Hotel Windsor in Melbourne. Ida's favourite colour is lilac so they wanted this reflected in the details of their special day. Congratulations guys!

Wednesday, October 19, 2011

Recipe for Bienenstich (bee sting cake)

photograph by Stewart Leishman

We made this cake for our recent photoshoot for Wedding Nouveau, its a traditional German cake named Bienenstich, or Bee Sting Cake - and not only did it smell amazing as we were baking but it tasted delicious! The crunchy honey almond topping reminded us so much of baking honey joys in the school holidays as kids - the smell, yum!!! The cake is really simple to make, and even though it has quite a few steps is totally worth it for a special occasion - we will be making this one again that's for sure!! (Recipe from about.com)

Makes 10 to 12 servings of Bee Sting Cake - Bienenstich

Ingredients:

  • Topping:
  • 7 tablespoons unsalted butter
  • 1/2 cup honey
  • 1 teaspoon vanilla extract
  • 1/2 cup sliced almonds
  • Cake:
  • 1 3/4 cups + 1 tablespoon all-purpose flour
  • 1 tablespoon baking powder
  • 1/2 teaspoon salt
  • 4 ounces (1 stick) butter, slightly softened
  • 5 tablespoons sugar
  • 1/4 cup honey
  • 2 large eggs
  • 1 teaspoon vanilla extract
  • 1/2 cup milk 
  • Filling:
  • 1/3 cup cornstarch
  • 1 1/2 cups milk
  • 1/4 cup sugar
  • 1 large beaten egg, room temperature
  • 1 teaspoon almond extract (optional)
  • 1 cup heavy whipping cream
  • 2 1/2 teaspoons cream of tartar
  • 1/4 cup confectioners' sugar

Preparation:

  1. For the Topping: In a medium saucepan, melt butter and honey. Bring to a boil, reduce heat and simmer 2 minutes. Add vanilla and almonds, remove from heat and set aside to cool.
  2. For the Cake: Heat oven to 375 degrees. Cut a parchment circle to fit the bottom of a 9-inch springform pan. Coat pan bottom and sides with cooking spray. Place parchment circle in bottom of pan.
  3. Combine 1 3/4 cups flour, baking powder and salt and set aside. In a large bowl or stand mixer, cream 4 ounces butter until fluffy, about 2 minutes. Gradually beat in 5 tablespoons sugar, about 3 minutes. Add 1/4 cup honey and beat 1 more minute.
  4. Blend in eggs, one at a time, beating after each. Add vanilla and half the flour mixture, and mix briefly. Scrape down sides of bowl. Add milk, then remaining flour, beating briefly after each addition.
  5. Scrape into prepared pan, spreading evenly. Sprinkle top with remaining 1 tablespoon flour, then pat top of cake smooth with your hand. Pour topping over batter, gently spreading evenly. Place pan on a baking sheet and bake 30-35 minutes or until toothpick tests clean. Do not overbake. Cool cake in pan completely on a wire rack.
  6. For the Filling: In the top of a double boiler over medium heat, combine cornstarch, milk and 1/4 cup sugar. Stir constantly until thickened, at least 3 minutes. Add in 1 beaten egg and keep stirring constantly for about 2 minutes until very thick. Remove from heat and stir in almond extract, if using.
  7. Chill in an ice-water bath, stirring occasionally. Place plastic wrap in direct contact with surface of pastry cream and refrigerate until cold, at least 1 hour.
  8. Whip the cream with the cream of tartar and confectioners' sugar until stiff. Add a dollop of cream to the pastry cream and stir to lighten the cream. Then fold in remaining whipped cream. Refrigerate while you prepare to assemble the cake.
  9. Run a knife around the edges of the cooled cake and remove the springform ring. Invert cake onto a plate. Peel off the parchment paper and invert again on a serving platter, so the almond side is showing. Cut cake in half horizontally and fill with pastry cream. Refrigerate until ready to serve.

Friday, October 14, 2011

collaboration with Stewart Leishman for Wedding Nouveau


We're so pleased to finally share these with you!

We have been looking for the perfect project to collaborate with the amazingly talented photographer Stewart Leishman for a little while now, and when the lovely Fri from Wedding Nouveau asked us to contribute to their Fall 'Playhouse' issue, we knew we had found it!

We were asked to create a dessert tablescape that was influenced by childhood fantasy. So we loosely took the theme of the story of Little Red Riding Hood and its German/French origins, and ran with it! Traditional German sweets like lebkuchen (spiced cookies), bienentsich (bee sting cake - which is DELICIOUS!), black forest cake, and classic donuts, teamed with a gorgeous centrepiece cake to create a lush dessert landscape. The stationery was based around a traditional papercut which told a typical 'boy meets girl' story. And our little matching favours sewn into sweet little glassine bags are a nice little take-home treat!

Working with Stewart was a great experience and a really fun morning in the Dandenongs on a rather chilly wintery morning! Thank you so much Stewart for interpreting our story so well!!

We are also giving away a digital copy of Wedding Nouveau's Fall issue, so be sure to check out our earlier post on how to enter - the competition closes on October 16th so hop to it!

Happy weekend!

Monday, October 10, 2011

Wedding Nouveau sneak speak


We are super excited to share with you a sneak peak of the upcoming Fall edition of Wedding Nouveau, a really lovely digital mag that is "the premiere style guide for intercultural brides and multi-ethnic weddings". Their strapline is 'Dream in Culture' which we think sits with the Cake Ink. branding quite nicely, so when we were offered the chance to submit some pics for a dessert buffet feature we jumped at the chance! We collaborated with the amazingly talented Melbourne-based photographer, Stewart Leishman, whose work is impeccable - he has such a great eye for capturing spirit and character and his images tell amazing stories!

You will have to wait until 'The Playhouse Issue' launches on October 13th (US time) to see our feature but here is a little taste! :)


We are also lucky enough to be able to give away a digital copy of Wedding Nouveau to one of our readers (thanks Fri!). All you need to do is subscribe to the Wedding Nouveau newsletter (you can do that here), OR become a 'liker' on their facebook page, then just leave a comment here to let us know you've done so, then consider yourself entered - easy! The competition is open to all our readers, and runs from October 10-16, with the winner announced on October 18th. Good luck!

Have a lovely week, and we will share more with you soon...

Thursday, September 15, 2011

1. Magnolia Rouge, 2. via 100 Layer Cake,
3. Ruby and Willow, 4. source unknown


With wedding season fast approaching us here in Oz, we have been flat out designing stationery and planning matching cakes, favours, menu and placecard settings, reception decor, floral arrangements - you name it, it's on our to-do list!!

With a couple of vintage-feel, winery/Australian themed weddings in the pipeline, we are loving the amount of fresh inspiration we keep finding day after day online! just a few of the gorgeous images we have been collecting are above... be inspired by natural colour palettes, recycled and found objects, and fresh posies in the prettiest of pinks!


Monday, August 1, 2011

AND THE WINNER IS...

Welcome to Monday, a new week and a new month! What a busy few weeks we have had here (hence lack of blog posts...) here is some stationery and party decor we have created lately for the gorgeous Josie and her 30th birthday celebrations!


We also need to congratulate the winner of our latest competition (winner was generated using random.org): Daisy and her Mickey Mouse cake took out the prize of some printable stationery! Congrats Daisy, we will contact you.

Have a lovely week peeps! x

Tuesday, July 12, 2011

Inspiration Central! Over at Inspire Me Weddings

We are in love with the new Inspire Me Weddings site - so much beautiful, pretty pictures to waste away some time over...

from Inspire Me Weddings!


Like this gorgeous colour inspiration post featuring Tiffany blue. With a Tiffany-inspired cake in the works here at Cake Ink. HQ its perfect timing!!!

Inspire Me Weddings can be found on facebook too... love!

Don't forget there are still a couple weeks to enter our giveaway... xo

Wednesday, July 6, 2011

GIVEAWAY TIME!!

Well, we are just so overwhelmed by the support and love we have received lately!! Can't quite believe we have over 800 'likers' on facebook! To celebrate we would like to give away a little DIY customised print-your-own party pack. This pack includes personalised artwork, sent to you via email, to print your own invites, menu cards, choc bar wrappers, favour bag tags and party sign, all in our super cute stripes and bows theme - just like Chrysa's first birthday party! We will even customise the design in any colour you choose, so think a soft pastel blue for a baby boy's name day, or a lovely yellow for a bridal shower!

The competition is open to anyone, anywhere in the world. To enter simply leave a comment here about your most memorable birthday cake - who made it, what flavour it was, what age you were and what it looked like!! The competition is open until July 31st 2011, and we will then pick a random winner and notify them by email. The prize will be available for use for 12 months, so don't worry if you don't have any party plans in the near future - we can send you artwork to use for next year's birthday!!

thank you so much to all our followers and fans - it really is so humbling and exciting to have people love our work!!

Tuesday, June 28, 2011

Pretty pink first birthday


We had the pleasure of putting together a cake and sweets table for the gorgeous Chrysa's first birthday! Chrysa is a girly-girl and Mum Elaine bought her a cute little tutu outfit to wear on her big day. We replicated the outfit on the custom cake topper and carried the pink bow theme throughout the table decor.


Chrysa's friends each received a custom favour bag to fill with sweets and a cute little pencil! Here is the birthday girl enjoying her party at the Clowning Around Play Centre in Northcote.

Chrysa's Mum told us she'll keep the cake topper to show her when she's a little older... how sweet! Happy first birthday from us xx
Cake, cupcakes, cake pops and custom chocolate bars: Cake Ink.
Custom table cloth, bunting and printed party stationery: Cake Ink.
Pink choc beans and accompanying glass vessels from: Sharnel Dollar Designs

Friday, June 10, 2011

FREE download - printable DIY treat cones!


Happy Friday! It's a long weekend here in Melbourne this weekend - yay!! we are almost in weekend mode, just a few jobs to tie up for the week.

We thought we might share some downloadable files with you guys today. Remember our little treat cones we used as favours on Mothers Day?? We created our own design using a template from the wonderful Martha Stewart (see her original paper cones here) - and we decided that we would share it with you!

Just click here to download the art files, it includes instructions plus there are two colourways!! Instead of reading Happy Mothers Day there is a cute little area for you to write your own message - sweet!

Enjoy - and happy weekend! xx

Friday, June 3, 2011

Pear and raspberry tea cake recipe

This is one of our fave tea cakes to serve during a relaxed afternoon tea. Made with sour cream and fresh poached fruit, it's moist and delicious with a light texture. Be sure to use real vanilla bean, it really does make a difference!

Pear and raspberry tea cake

Ingredients

250g unsalted butter, at room temperature
350g caster sugar
1 and 1/3 vanilla beans, seeds scraped
4 eggs, at room temperature
200g tub sour cream
300g self-raising flour, sifted
24 poached pear wedges (see method below)
150g fresh (or frozen) raspberries

Method

For poached pears, peel and wash 3 beurre bosc pears and cut in to 24 wedges (8 wedges per pear). Start your sugar syrup by adding 400g caster sugar, 700ml water, the scraped seeds from 1/3 of a vanilla bean and half a lemon, sliced, to a large saucepan. Bring to the boil on high heat, stirring to dissolve the sugar. Once boiling, turn the heat down to a slow simmer and add the pear wedges to poach for around 25 minutes, or until the pear can easily be pierced with a knife. Take off heat and drain, reserving the liquid if desired. Allow to cool.

Meanwhile, preheat oven to 200 degrees celcius (190 degrees celcius if fan forced). Grease and line a 12" round cake tin with baking paper. Add butter to electric mixer and using paddle attachment, cream butter for about a minute. Add the sugar and vanilla seeds and beat on medium-high until pale and creamy. Add eggs one at a time, making sure it's well incorporated after each addition. Turn the mixer speed down to medium-low and add the sour cream in two batches until just combined, then add the flour in two batches being careful not to overwork the batter.

Spoon the batter in to the prepared tin and using a spatula gently smooth the top to form an even layer. Arrange the poached pear wedges in a circular formation on top of the batter and sprinkle the raspberries on top. Bake in oven for 55 minutes to 1 hour 15 minutes, or until a skewer poked in the centre comes out clean. If the top of the cake starts to brown, cover loosely with baking paper. Remove from oven and allow to cool in tin for 30 minutes before turning on to a wire rack to cool.

Cake is best eaten on the day of baking but will last well for up to three days in an airtight container.

Best served with a spoon of double cream and a lovely pot of English Breakfast. Enjoy!

Friday, May 27, 2011

Mother's Day Tea Party


We created this custom afternoon tea table for Mother's Day earlier in the month at the gorgeous Eynesbury Homestead just outside Melbourne. We think it would be just as fitting for a bridal shower or special afternoon tea!

A huge thank you to the oh-so-talented Amy Atlas and her team for featuring our table on her fabulous blog! You can see the post here.

Custom cake, cupcakes and yo-yo cookies:  Cake Ink.
Custom invitations, cone favour boxes and doily garland: Cake Ink.
Macarons: Lindt
Flowers: Ann's flowers, Cheltenham


We'll post a recipe for one of our all time fave tea cakes next week, you won't want to miss it!